
Potato Pancakes, Cabbage Rolls, and Chicken Kyiv, Oh my!
Fun fact: Canada has the world’s third largest population of Ukrainians outside of Ukraine. The part of Canada where we’re from (the prairies) has 37.2% of all Ukrainian-Canadians, and our city alone has 7% of all Ukrainian-Canadians. So when we say that almost everyone we know is either Ukrainian-Canadian or has immigrated from Ukraine, we aren’t really exaggerating all that much.
We have many fond memories as kids that center around Ukrainian heritage:
Learning how to make perogies and cabbage rolls with Grandma (and then subsequently devouring them)
Visiting the world’s largest pysanka in Vegreville, the world’s largest sausage in Mundare, and the world’s largest perogy in Glendon (we like big things)
Checking out the Ukrainian Cultural Heritage Village
Having a friend who doesn’t have a grandmother, they have a babusia/babushka/baba
Given what’s happening in the world right now, we wanted to do something to honour Ukraine, its people, and its culture. Of course we’re a food blog, so really we can’t do much. What we can do is highlight a few of our favourite childhood dishes from a culture that we love. If you’re feeling anxious and stressed (if you’re not, tell us your secret), cooking can be a great way to improve your mental health. We hope that you try these recipes and get a chance to connect with a rich and vibrant culture.
Potato Pancakes
Potato Pancakes (or Deruny) are exactly as they sound. Pancakes. But made with potatoes. (And onion too.) We don’t know what was in the air when we were cooking, but we dun goofed with this recipe. We managed to salvage it, thankfully!
(We also messed up the Chicken Kyiv too… more on that later.)
Ingredients for Potato Pancakes
1.5 lbs of yellow potatoes, peeled
1 medium onion
1 egg
3 tbsp flour
1 tbsp sour cream
Salt and pepper

Ignore Brittany’s crooked container clasp in the background.
Do’s & Don’ts of Potato Pancakes
✔️ Do: grate your potatoes and onion using the star shaped grater. It’s okay that it’s going to become liquid mush.
🚫 Do not: Grate your potatoes and onion using the regular cheese grater side. You’re not making latkes!
✔️ Do: mix your ingredients together (minus the oil), so you have a nice liquid batter.
🚫 Do not: wring your potatoes and onion in a cheesecloth to squeeze out the liquid. We repeat: you’re not making latkes.
✔️ Do: warm up a skillet with some oil on medium high heat, and ladle your batter into the pan to make cute little potato pancakes.
🚫 Do not: fuck up so bad that you have to put your potatoes and onion in a food processor with some water and cornstarch to make up for the lost liquid you drained, and also to fix the issue of using the wrong side of the grater.
✔️ Do: serve with sour cream and enjoy.
🚫 Do not: serve with salsa and make a Ukrainian cry for no reason. (Trevor maintains this is a delicious option. He has no claim to Ukrainian heritage.)
Anyways, just follow the “do’s” and avoid the don’ts and you should be fine.

Potatoes are delicious in every form.
Cabbage Rolls
Cabbage rolls (or Holbusti) are made a bit differently by everyone. Instead of trying to combine the best of all cabbage roll recipes that exist on the internet, we went with Brittany’s Grandma’s recipe. (It’s simple and delicious — she has made it a few times, along with homemade perogies.)
Family recipes are funny, because oftentimes they don’t come with measurements or great instructions — the person making them has a process and just knows what to do. Brittany has made cabbage rolls with her Grandma before, but it has been a while — the recipe below is based on her bad memory and Grandma’s notes.
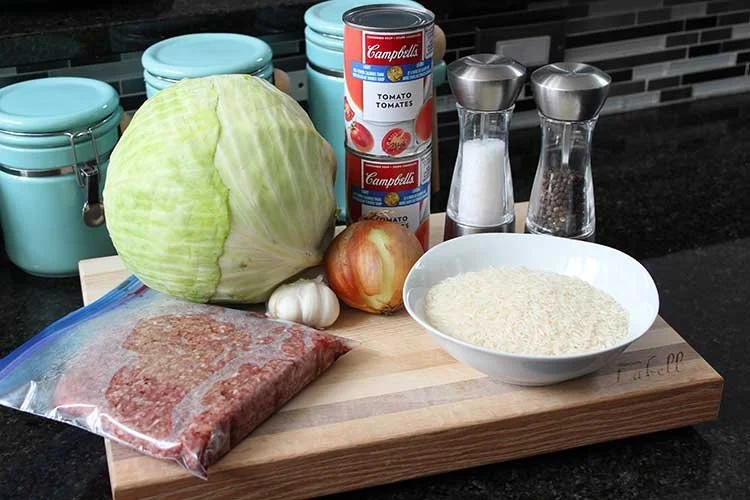
Ingredients for Cabbage Rolls
1 large head of green cabbage
1 ½ lbs ground beef
1 medium onion, diced
1 ½ cups white rice, cooked
3 cans of tomato soup
Salt and pepper
Step 1: Boil Your Cabbage
Now, this can be done a few different ways.
Grandma’s way: core your cabbage, stick it in a pot of boiling water, and peel off leaves as they become loose. This video highlights the technique! Put your cabbage leaves on a plate or in a bowl to cool down and ready for rolling.
The way that we did it: stick a huge BBQ fork into the core, rotate the cabbage because our pot wasn’t big enough to fully submerge it, and giving the layers a minute or two before you cut them off. This method worked great at the start, but then the cabbage became a heavy water-laden ball that made the BBQ fork bend. Oops. 😅 It still worked though. If you don’t want to almost cut off your hand off with a paring knife while trying to core your cabbage, try this method out.
The internet says… that you can steam a head of cabbage in the microwave. But if you get a big cabbage, this method won’t work as it likely won’t fit in your microwave. So we’re not sure about this one.
Step 2: Prepare Your Filling
Next, combine cooked rice, diced onion, one can of tomato soup, salt, and pepper. Grandma says you should add half the can and then add how much more you need to glue everything together. You don’t want your filling to be too soupy! ¾ to a full can should work.
We also added a bonus ingredient, that isn’t original to Grandma’s recipe: a few cloves of minced garlic. Because we like garlic. A lot. 🧄 10/10, would add to cabbage rolls again.
🧑🍳 Mediocre Tip: Forget to cook your rice before boiling your cabbage? Use Minute Rice to speed things up! (This is what Grandma does.) If you remember to put on the rice while preparing your cabbage and dicing the onion, it’ll be done in time! Just spread it out on a pan so it cools faster, that way you don’t burn yourself when filling and rolling your cabbage rolls.
Oh, and don’t use tomato sauce instead of tomato soup, it’ll be too strong and tangy. You want the smooth and creamy tomato taste that tomato soup has! 🍅
Step 3: Assemble Your Cabbage Rolls
This is the fun part! Take a hefty amount of filling and put it on your cabbage leaf, closer to the part of the leaf that was attached to the core. We could tell you an amount but… just measure with your heart. It’s really going to depend on how big your cabbage leaves are. Tuck in both sides and roll! It’s just like rolling a burrito or snack wrap.
With this recipe, we made a dozen cabbage rolls, which didn’t use nearly all of our cabbage leaves, but we ran out of filling. Double this recipe for more cabbage rolls!
🧑🍳 Mediocre Tip: If you didn’t core your cabbage, your individual cabbage leaves might still have some of the tough core part on the edge. Cut this part off before assembling the cabbage roll for an easier assembly and better end product.
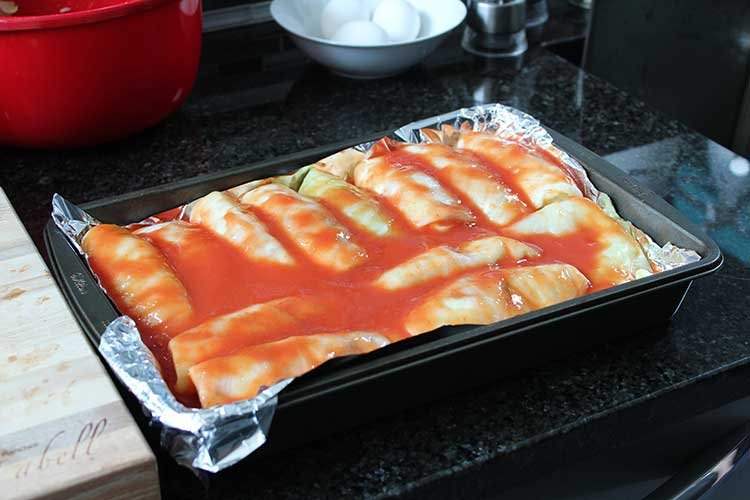
Cabbage rolls, pre-baking.
Step 4: Time to Bake
Take a baking pan and put a layer of tomato soup on the bottom, to prevent the cabbage rolls from sticking. Then, lay your cabbage rolls down side-by-side in the pan. Top with more tomato soup. You can add some water to your tomato soup if you feel like you need a bit more to cover your cabbage rolls.
If you have some extra cabbage, you can put that on top to protect your cabbage rolls so they don’t burn, or put some foil on top when baking. Or do both. (Why not?)
Brittany’s Grandma bakes at 325°F for 2.5 hours, while other recipes call for cooking at 350°F for a longer period of time. Honestly, we weren’t good at taking notes with this one, and we can’t remember at what time/what temp we cooked for. But it was at least 2 hours, probably more while we were working on other recipes.
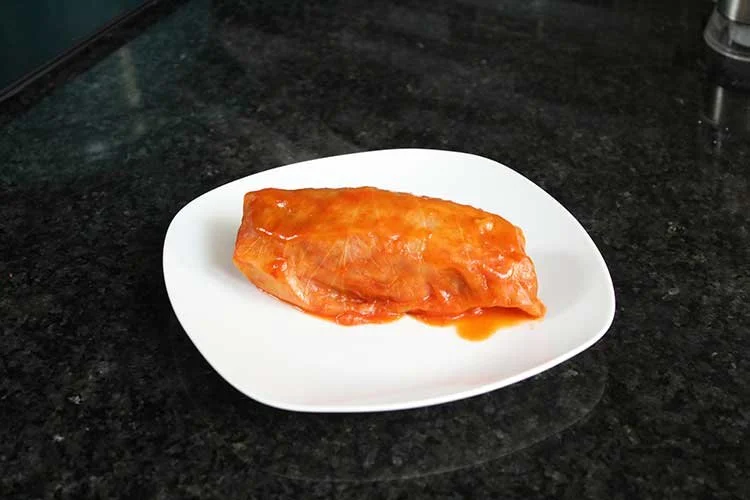
These cabbage rolls made Trevor like cabbage rolls.
Bonus cabbage roll content: Interested in the history of the humble cabbage roll? Troika breaks down the differences in cabbage rolls from different cultures!
Chicken Kyiv
If you’ve ever had Chicken Cordon Bleu then you know the basic idea of Chicken Kyiv. Take a chicken breast, cut it in half, and stuff it with something delicious. Unlike chicken cordon bleu, Chicken Kyiv is only stuffed with garlic and herb butter. That’s it.
(And yes, we’re saying Chicken Kyiv instead of Chicken Kiev — learn why.)
Like cabbage rolls, everyone has a slight variation on what herbs to include or not include in the butter. We took a look at a few different recipes and settled on garlic, parsley, and dill. This was a winning combination!
Ingredients for Chicken Kyiv
4 chicken breasts
2 eggs, beaten
¾ cup flour
1 ½ cups panko bread crumbs
8 tbsp of unsalted butter at room temperature
1 garlic clove, minced
1 tsp lemon juice (fresh is best!)
2 tbsp fresh parsley, chopped
1 tbsp dill, chopped
Salt & pepper to taste

Step 1: Make Herb & Garlic Butter
Combine the chopped parsley and dill, butter, garlic, and lemon juice together. Add a little salt and pepper to taste. That’s really it. The recipe we were following said to throw it in the freezer while you work on everything else, but we’re not really sure that this is a necessary step.
Step 2: Stuff Your Chicken
Take your chicken breasts and butterfly them. To do so, cut the chicken breast in the middle so that it opens like a disgusting, salmonella filled meat book. Don’t cut all the way through as you want to be able to wrap it back up.
Place approximately 2 tablespoons of your garlic herb butter into the butterflied chicken breast. Then gently close it back up. If you have to, use some toothpicks to help hold it close.
🧑🍳 Mediocre Tip: We also attempted to cut a pouch in the chicken breast instead of butterflying it and rolling it. It didn’t really make much of a difference for us, so go ahead and use that method if you feel like.
Step 3: Bread Your Chicken
Before you do this, set up your breading stations. This includes a bowl of beaten eggs, another with flour, and lastly a bowl of breadcrumbs. Coat the chicken in flour, then egg, then breadcrumbs. Then you’re done.
🧑🍳 Mediocre Tip: If you want, you can season your flour or breadcrumbs with salt and pepper. We forgot, so we seasoned the chicken immediately after it was taken out of the oil so that it could absorb the salt and pepper.
Step 4: Fry Your Chicken
This is the fun part of the whole recipe. Place a large pot and fill it with about 1 inch (2.5cm) of oil over medium heat. Let the oil get to a temperature of about 350°F. Place one chicken breast in the oil and fry it until the internal temperature reaches 165°F. Take it out, and let it rest on some paper towel while you fry the rest of the chicken.
Hot oil is hot and dangerous. So be careful when you’re frying the chicken.

Super fried. Super delicious.
🧑🍳 Mediocre Tip: Reading is fundamental. We didn’t read the part of the recipe where you’re only supposed to fry the chicken for a little bit in oil and then finish it in the oven. Ours turned out super tasty (because let’s be real, fried chicken is always good), but if you want to have a less violent cooking experience, definitely use the oven.

We think we did alright.
We are in the darkest and weirdest timeline currently. If you have a local Ukrainian store or restaurant, consider supporting them and see if they are collecting donations to help Ukraine. Malina Bakery in Edmonton was collecting donations, in addition to having absolutely delicious baked goods. If you’re in the area definitely check them out!
If you don’t have any local Ukrainian businesses near you, consider donating to a charity if you can afford to. We’ve left some links below:
Canadian Red Cross: https://donate.redcross.ca/page/100227/-/1
American Red Cross: https://www.redcross.org/donate/donation.html/
National Bank of Ukraine: https://bank.gov.ua/en/news/all/natsionalniy-bank-vidkriv-spetsrahunok-dlya-zboru-koshtiv-na-potrebi-armiyi
Come Back Alive in Ukraine https://www.comebackalive.in.ua/
Ukraine Crypto Wallets: https://twitter.com/Ukraine/status/1497594592438497282
Slava Ukraini 🇺🇦