
Stocks & Broths: Everything You Need to Know To Make Delicious Liquid Gold
A long time ago (in a galaxy far, far away pls don’t sue us Disney) we made French onion soup. Aside from it being an absolutely delicious soup to make, part of the reason we wanted to try our hands at it was because we wanted to make some beef…stock? Broth? We weren’t really sure. Turns out that we didn’t do the best job when we made it and for a long time we discussed redoing the beef stock.
But who has time to let beef stock simmer for hours, and hours on end? Certainly not us.
Cut to the present day. It’s fall, which means it’s soup season, and it’s getting cold in our part of the world, which means it’s almost always a good time to spend an afternoon cooking up some soup. And what do almost all good soups and stews use as a base? Stocks and broths. So we decided to finally dig into stocks and broths and spend an entire afternoon making a whole bunch of different types of stocks and broths.
Stock vs Broth — What’s The Difference?
The answer isn’t as straightforward as you might think. The terms can mean slightly different things depending on whether you’re talking about it from a historical perspective or a modern perspective. In an effort to not write an entire essay on the topic (unlike that time where we wrote a whole bunch about spices) we’ve come up with what we think is probably the clearest distinction:
Stock is made with bones only, broth is made with meat (and possibly bones). Bone broth is not a thing — it’s a made up marketing term. Bone broth is just stock. Similarly, veggie stock is not a thing. By our definition, veggie broth isn’t actually a thing either. But we don’t have another word for it, and veggie broth doesn’t contain bones, so we’re calling it a broth.
Both of them utilize vegetables (such as a classic blend of celery, carrot, and onion) and both often use thyme (or other gentle herbs). Broth is sometimes seasoned with salt and pepper, stock is almost never seasoned.
Okay, but why are stocks and broths different? Since stocks use bones (usually bones with a lot of connective tissue) they will generally have a very high gelatin and collagen content, which means that they will feel…thicccccc. A good way to tell if you’ve made stock properly is that it should set almost like Jell-O when you put it in the fridge. Stocks are generally used as the base for something else — you’ll possibly reduce it, add some other things to it, and season it. Sauces are a classic example of what to do with stock.
Since broths use meat as the primary way to give flavour, they tend to be less viscous than stocks. Generally you’re going to want to use broths as a base for soups and stews (and other liquid based recipes, like, say, chili).
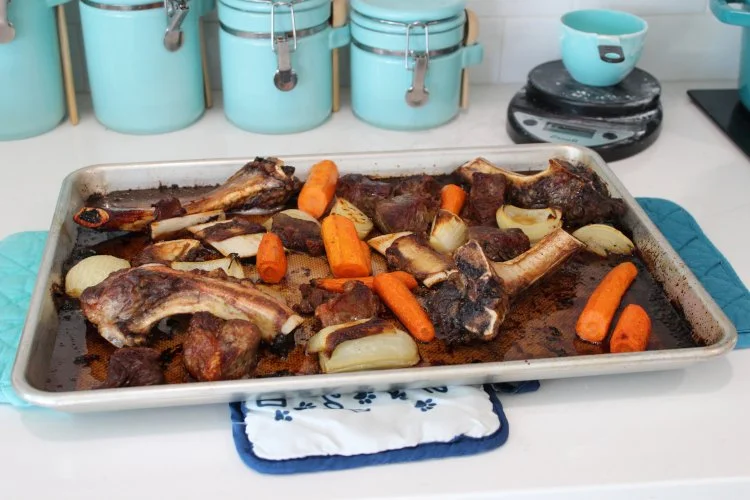
Finally, there is sometimes a distinction between light and dark stocks (sometimes called white and brown stocks). If you roast the bones before simmering them in water, it’s a dark, or brown stock. If you don’t, it’s a light or white stock.
How to Make Stocks & Broths in a Regular Pot vs Instant Pot
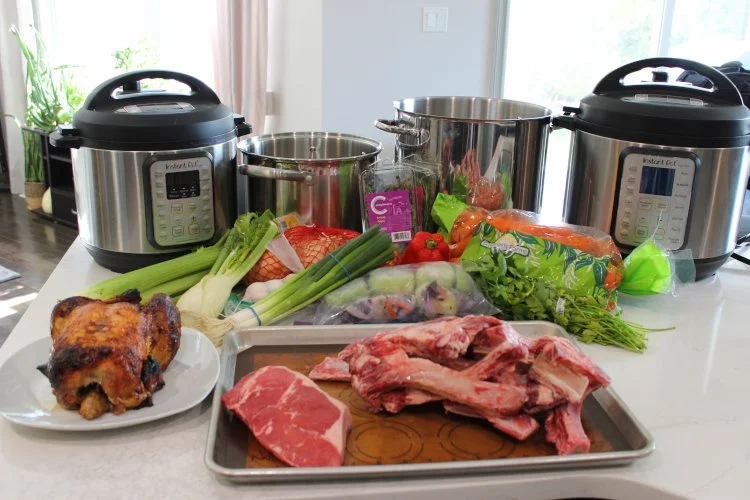
To become stock and broth experts we tried two different methods — the low and slow method in a pot on the stove and the quick and easy method in an Instant Pot.
For a vegetable broth, you’ll need veggie scraps or whole veggies, roughly cut into chunks. Think carrots, onion, celery, and garlic at the very least. How much? We can give you a recipe, but really you can just wing it. (Follow our tips below!)
For beef stock or chicken stock, you’ll also need bones and maybe a little bit of meat for added flavor.
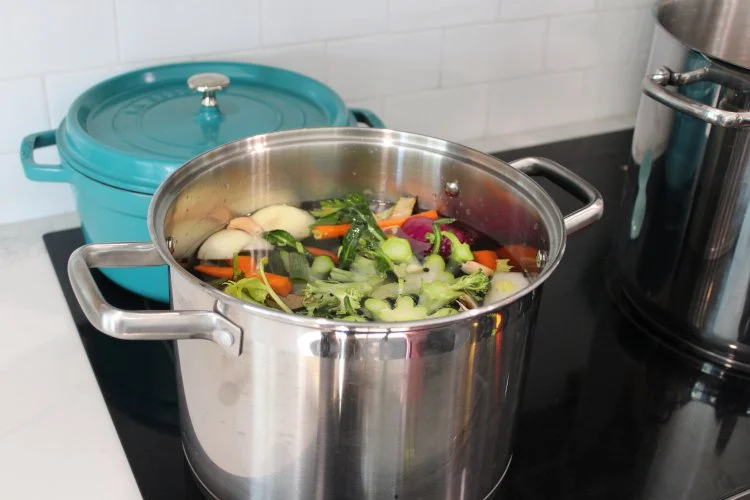
For the stock pot (stovepot) method, the key is to go low and slow. You want to bring your stock/broth to a simmer, you don’t want to boil it. You’ll need about 4 to 6 hours of it simmering uncovered before it’s ready. You will occasionally need to skim any scum that comes to the surface (this will help keep your stock clear). Patience is the name of the game here!
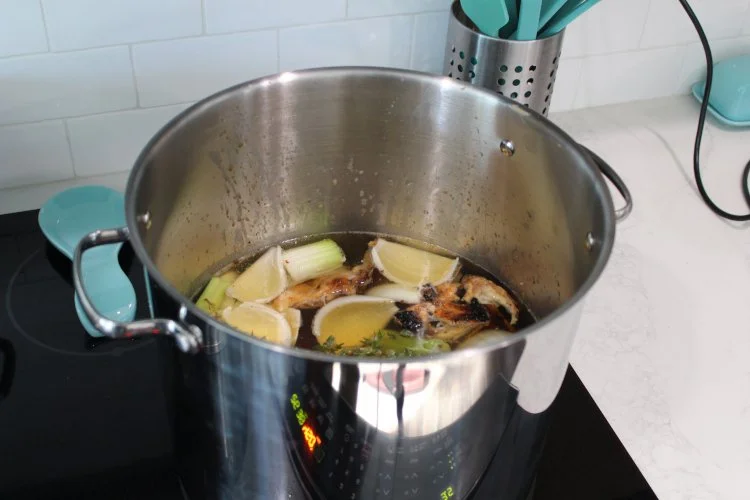
🍲 Mediocre Tip: Taste your vegetables! If they don’t taste like anything, they’ve given up their flavour and it’s a good sign that it’s ready.
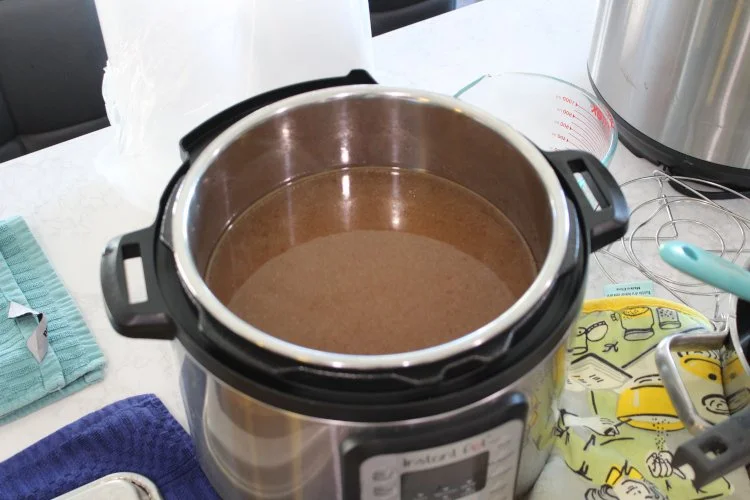
For the Instant Pot method, you just toss everything in, add water to the fill line, close the lid, and press the “Soup/Broth” button — this will cook on high pressure for 30 minutes. Or if you want a stronger flavor you can pressure cook it for longer. This will result in a stock that’s darker. (For example, this Serious Eats recipe cooks on high pressure for 2 hours and 30 minutes.) Allow it to depressurize naturally and voila! Just strain and you’re done.
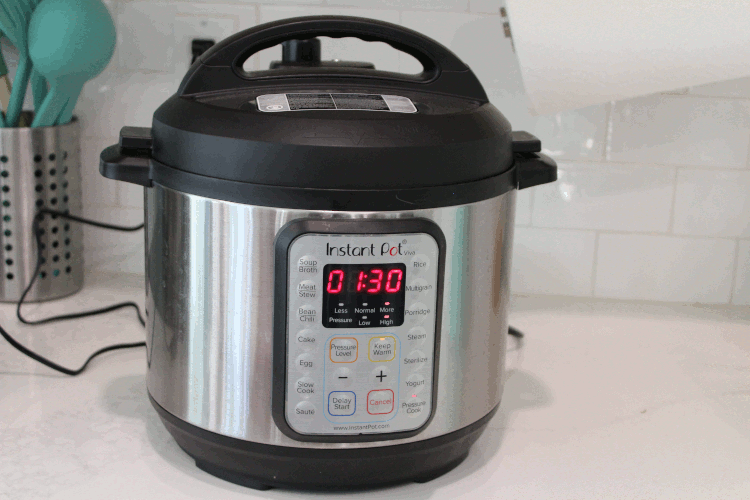
(Your Instant Pot will also forever smell like delicious stock now, no matter how well you clean it. You’re welcome.)
Quick Tips for Making Stocks & Broths
Keep a bag in the freezer and add veggie scraps to it. This can be carrot peels, the tops and ends of green onion, onion and garlic skins and ends, mushroom stems, etc. When the bag is full, you can use all of your scraps to make a delicious broth.
Buy a rotisserie chicken from Costco — it’s super cheap. Not only will you get a ton of meat for salads, wraps, and soups, you’ll also get a chicken carcass to make stock! Win win.
If you like seafood, use fish heads and shrimp shells. (We aren’t big on seafood, so if you make a delicious fish stock let us know.)
Don’t use red cabbage, red onion, or beets — you’ll make a purple liquid. (Oops.)

Also don’t use potato peels — they can make your broth cloudy and starchy.
If you have the time, roast your bones and veggies before making stock for a richer, deeper flavor.
Don’t forget aromatics! Bay leaves, whole peppercorns, thyme, and parsley stems are all great additions.
A lot of other herbs such as rosemary, sage, and tarragon can also be added but use them with caution! They are very potent and may overpower the flavor.
But don’t add salt. You don’t want to accidentally make your stock too salty when it reduces. Instead, add salt to it when you’re using it in a recipe.
Use an Instant Pot to make the whole process faster. (Does anyone else get a little bit nervous when they use their Instant Pot? Just us? Okay.)
Strain your broth with a fine-mesh strainer to make your stock to filter out the little bits of herbs and other small pieces of meat, bones, and veggies that may have come loose.
Easily remove the fat by waiting for your stock to cool first. Simply scrape off the top layer that appears once it’s fully cooled — you can speed up the cooling process by putting it in the fridge, or by putting your pot or Instant Pot insert into ice water. (We’re lazy, so this beats slowly skimming the fat with a spoon while it’s simmering.)
Freeze in portions — we love these quart containers. (Bonus points: they also make you feel super chef-y.) Just don’t fill them up completely to the top, you’ll want to leave a bit of room for the liquid to expand when it freezes.

What we made in a day with two Instant Pots and two stock pots.
Cost Analysis
If you’re using veggie scraps and bones from beef that you’ve de-boned or a leftover chicken carcass, the cost of making your own homemade stock or broth is free.
And you know what the best things in life are? Free things.
If you’re going out of your way to buy veggies and bones for your stock, then you’re going to probably not be as cost efficient as just buying it from the grocery store. But it will taste better!
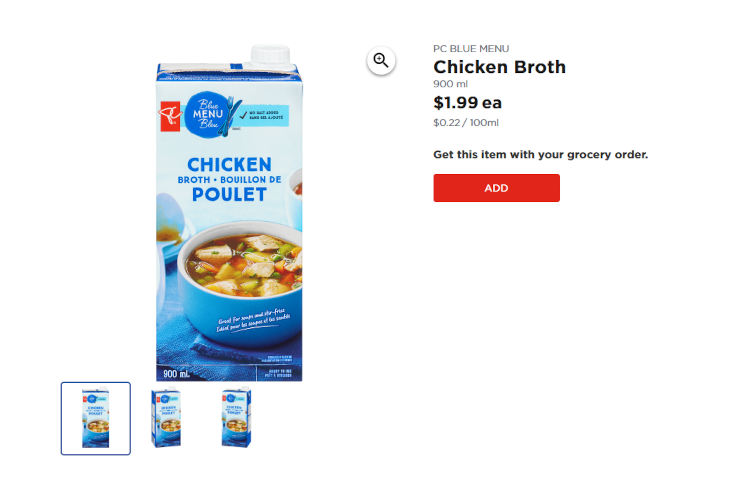
Of course like all things in life, you pay for what you get. A liter of stock can range from $2 to $10 depending on the brand.
If you’ve read this post and you’re like “yea, I can’t be bothered to make my own stock or broth” or maybe you want a shortcut for those days when you don’t have time or ran out of your supply in the freezer, then we recommend Better Than Bouillon. It tastes great and you can customize how strong you want it to be by adding more or less paste to your water. It also lasts forever in the fridge! Buy it at Costco for the best price.
Stocks and Broths Bonus: A Mediocre Recipe for Chicken Soup 🐔
What, did you think that we were going to tell you all about stocks and broths and not include a recipe for soup? Of course we are.

Ingredients
4-6 bone in, skin on chicken thighs*
Neutral oil like canola
1 onion, finely diced**
2-3 ribs of celery, coarsely chopped**
1 large-ish carrot, coarsely chopped**
4-6 garlic cloves, minced
2-4 slices of lemon
Fresh grated ginger, to taste
A big handful of roughly chopped dill
2-3 quarts (roughly 2-3L) chicken stock***
Salt, to taste + more for chicken
Pepper, to taste + more for chicken
Cayenne pepper, to taste + more for chicken
Red chili flakes, to taste****
Garlic powder, for dry rub
Onion powder, for dry rub
Cumin, for dry rub
3 sprigs thyme
Chopped green onion
*You can go with boneless, skinless chicken thighs, but the skin will render some fat that’ll we’ll be using, and the bone will help keep the thighs from drying out when we roast them. You can then store the bones for the next time you make stock. It’s like poetry, it rhymes.
**You want the onions very finely diced so that they sort of melt into the soup. The carrots and celery can be roughly chopped into bite sized pieces. You want those to retain a bit of crunch.
***Yes we are asking for stock, not broth. Stock is has more body and really adds to the heartiness of the soup.
****Every time that red chili flakes come up, we feel the need to say this: BE CAREFUL WITH THE RED CHILI FLAKES. Go easy.
🍲 Mediocre Note: All of these are incredibly rough estimates. For something like soup, ingredients should be measured with your heart. Don’t let us or our recipe keep you down, you have free will after all — add or subtract as you see fit. Except for the dill and ginger. Those aren’t optional. And the lemon slices. This is a fatty soup, the lemon helps lighten everything up.
Step 1: Roast the Chicken Thighs
Preheat your oven to 375°F.
Coat the chicken thighs in oil. This will help the seasoning stick to them and will help with browning.
Make a rub with your favourite seasonings. We used salt, pepper, garlic powder, onion powder, cayenne pepper, and cumin. Coat the oiled chicken thighs in your dry rub. We don’t really have any ratios or measurements for you. Just add the spices and seasonings until it smells good. Be careful with the cayenne and the salt.
Place the chicken thighs on a wire rack on a baking sheet. Make sure to give them some space so that they crisp up nicely.
Roast the thighs for about 30 minutes. They don’t need to be cooked all the way through as they will simmer in the soup for a bit which will finish cooking them if they aren’t done yet.
Optionally, feel free to put them under the broiler for a minute or two to really crisp up the skin.
Let the chicken thighs cool a bit, then debone them and cut or shred the thighs into bite sized chunks.
Save any chicken fat that collects in the baking sheet or on the cutting board from deboning the thighs.

Step 2: Make the Soup
Put the chicken fat in a large pot over medium-high heat. You can also add some olive oil as well if there wasn’t a lot of chicken fat that rendered.
Start cooking the onions in the fat. Let them really cook until they’ve started getting some browning on them.
Add in the garlic and let it cook out for a minute or two.
Add the celery and the carrot. Let them cook out for a minute or two.
Add your stock and bring it up to a boil.
Once boiling, start adding your spices. We recommend adding a little bit of salt, pepper, cayenne, red chili flakes, and fresh thyme right now to develop the flavour.
Reduce to a simmer, and cook covered for about 15 minutes.
Add your chopped/shredded chicken thigh into the pot.
Cover and let it cook for about 20-30 minutes.
By now the soup should taste less like celery and carrot and more like chicken. If it doesn’t, cover the pot and let it simmer for another 5 minutes and check again. Keep repeating until chicken is the predominant flavour.
At this point add in some freshly grated ginger, more salt if needed, and any other seasonings you wish.
Cover and let the soup simmer for another 5-10 minutes.
Taste again. Adjust the seasoning as required, including adding more ginger if you want more ginger.
Once you’re happy with the flavour and seasoning, add in 1-3 slices of lemon and let the soup simmer for an additional 5 minutes.
Taste the soup again. If you are happy with the flavour, now is the time to add the dill and the green onion. Let the soup cook for a minute or two.
Serve.
Yes this is a lot of steps, but the key to a good soup is a lot of tasting, adding, waiting, tasting, adding, waiting. It’s very simple, it just looks super intimidating when written out into a long list of things to do. (Any Mediocre Chef can do this. 😉)
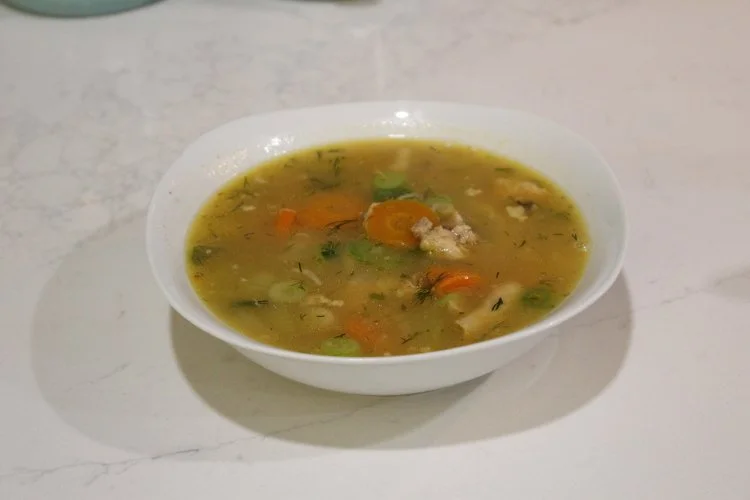
Good soup.
Unironically, this is one of the better chicken soups we’ve ever had in our lives (sorry, Grandma). It’s definitely chicken soup, but the kick from the cayenne, chili flakes, and ginger, as well as the fresh tang from the dill and lemon, really turn this soup into something that is complex and more than just one note.
What To Use Stock/Broth For
You’ve made a delicious flavor liquid. Now what? Here are a few recipe ideas to get you started:
Make French onion soup for a perfect cozy fall dinner
Cook up a delicious risotto and impress your friends
Make white rice taste better — use stock instead of water
Prepare a bunch of Italian beef sandwiches
Try something new and make Morisqueta Michoacana (you won’t regret it)
Create a big batch of chili